
View
React Element에 style 적용하기
- css로 적용하기 (className)
- className을 사용하는 것을 추천(HTML에서 이미 사용하는 이름은 React에서 지양)
- 문자열
- inline style 로 적용
- props로 전달되어 사용된다.
- style은 객체로 적용, 카멜케이스로 작성할 것(예 : backgroundColor)
const element = ( <> <button className="alert" style={{color: "red"}}>버튼</button> </> )
ref로 DOM다루기
useRef를 사용
- 스스로 최적화하는 React
- DOM조작을 하게 되면, 이를 벗어나게 된다.
const inputRef = React.useRef();

const Input = () => {
return (<input ref={inputRef}/>) }inputRef.current.focus();로 해당 input 요소에 focus
DOM? Element?
React로 그린 화면에서는 브라우저는 DOM트리로 이해하고 있다. - DOM조작
Form
label, input, submit
React에서는 label에 for대신 htmlFor를 사용한다.
React에서는 value대신 defaultValue를 사용한다.
export default function App() {
  const Form = () => {
    const handleSubmit = (e) => {
      e.preventDefault();
      alert(e.target.elements.fname.value);
      // console.dir를 이용해 event.target 안에 어떤 요소들이 들어있는지 쉽게 확인할 수 있다.
    };

    return (
      <form onSubmit={handleSubmit}>
        <input id="fname" defaultValue="Kate" name="fname" type="text" />
        <button>클릭</button>
      </form>
    );
  };

  return (
    <div className="App">
      <Form />
    </div>
  );
}e.target.elements.fname.value의 fname은 id인가 name인가?
https://developer.mozilla.org/en-US/docs/Web/API/HTMLFormElement/elements#quick_syntax_example
You can access a particular form control in the returned collection by using either an index or the element's name or id attributes.Form - controlled & uncontrolled
validation, value등 활용하기
value에 직접 state를 입력 - controlled
uncontrolled - 위처럼 event target의 value
- validation :
onChange를 이용하는 것이 편리 - controlled : input의 value를 직접 관리(useState) - 리액트 컴포넌트에서 관리
Error Handling
try... catch... (finally) 처럼 에러를 핸들링해 보자
JS의 Error로 인해 React의 컴포넌트가 그려지지 않는 경우도 있다.
Children에서 에러가 나도 부모 컴포넌트는 그려졌으면 한다..

Error Boundary
https://ko.reactjs.org/docs/error-boundaries.html
class 컴포넌트를 사용한다.
class ErrorBoundary extends React.Component {
  // constructor(props) {
  //   super(props);
  //   this.state = { hasError: false, error: null };
  // }
  state = { error: null };

  static getDerivedStateFromError(error) {
    return { error };
  }

  render() {
    const { error } = this.state;
    if (error) {
      return <p>some thing went wrong ... {error.message}</p>;
    }

    return this.props.children;
  }
}

const Child = () => {
  throw new Error("error message ❌");
  return <p>자식</p>;
};

export default function App() {
  return (
    <div className="App">
      <ErrorBoundary>
        <Child />
      </ErrorBoundary>
    </div>
  );
}
render() {
    const { error } = this.state;
    if (error) {
      return this.props.fallback;
    }

    return this.props.children;
  }
}
// 중략

<ErrorBoundary fallback={<p>에러 발생</p>}>
    <Child />
</ErrorBoundary>
위와 같이 수정하여 원하는 fallback을 화면에 그릴 수도 있다.
어떤 화면을 그릴지 내가 직접 넘겨준다.
fallback props에는 원하는 컴포넌트를 만들어서 넘길수 있다(<Fallback/> 과 같이)
Fallback : Error가 났을때 대체하여 보여줄 컴포넌트(back up)
key, re-render

https://ko.reactjs.org/docs/reconciliation.html
React는 key값이 있다면 해당 key를 통해 기존 트리와 이후 트리의 자식들이 일치하는지 확인한다.
컴포넌트를 재사용하기 위해서 올바른 key를 부여해야한다.(중복이 없고, 바뀌지 않는 값)
상태 끌어올리기
형제 컴포넌트의 상태를 알기 위해서는 부모로 lifting up
Props drilling 상태를 내려준다.
Fetch API
MDN : https://developer.mozilla.org/ko/docs/Web/API/Fetch_API/Using_Fetch
import React from "react";
import "./styles.css";

export default function App() {
  const [data, setData] = React.useState(null);
  const [error, setError] = React.useState(null);

  React.useEffect(() => {
    fetch(
      "URL"
    )
      .then((res) => res.json())
      .then(({ data }) => setData(data))
      .catch((error) => setError(error));
  }, []);

  if (data === null) {
    return <p>loading...</p>;
  }

  if (error) {
    return <p>에러가 발생하였습니다. {error.message}</p>;
  }

  return (
    <div>
      <p>People</p>
      {data.people.map((p) => (
        <p>
          {p.name} {p.age}
        </p>
      ))}
    </div>
  );
}
공식문서 보기

만든 사람이 만든 목적, 사용법을 정리 해 두었다. 이를 통해서 기술을 익힐 수 있다. 설명서
- 불친절할 수 있고, 한국어 지원이 되지 않을 수 있다.
- Tutorial, 예제, Sample 등이 없을 수 있다.
공식문서를 찾아보기
MDN, React 공식 문서 등
- 바로 써보기
- 문서를 보고 이해해보기
문서도 보고, 예제도 적용해보기.
처음에는 어려울 수 있으나 연습하고 반복해보자
CRA (Create-React-App)
https://ko.reactjs.org/docs/create-a-new-react-app.html#create-react-app
npx create-react-app my-app
cd my-app
npm start- node 설치 필요
- node 설치시 npm(node package manager)도 자동으로 설치된다.
- node 설치시 npx(node package runner)도 자동으로 설치된다.
JSX
JSX 없이 사용하는 React : https://ko.reactjs.org/docs/react-without-jsx.html
React.createElement를 이용
- 문자열도, HTML도 아니다.
- JavaScript를 확장한 문법
- 중괄호(
{})내부에는 JavaScript를 사용할 수 있다. - HTML 속성 대신 카멜케이스를 사용(class아닌 className)
- XSS공격을 방지 (https://ko.reactjs.org/docs/introducing-jsx.html#jsx-prevents-injection-attacks)
Props
Docs: https://ko.reactjs.org/docs/components-and-props.html
컴포넌트 합성 : https://ko.reactjs.org/docs/components-and-props.html#composing-components
컴포넌트 추출 : https://ko.reactjs.org/docs/components-and-props.html#extracting-components
- 여러 컴포넌트로 나눔 -> 재사용성이 올라감
처음에는 컴포넌트를 추출하는 작업이 지루해 보일 수 있습니다. 하지만 재사용 가능한 컴포넌트를 만들어 놓는 것은 더 큰 앱에서 작업할 때 두각을 나타냅니다. UI 일부가 여러 번 사용되거나 (Button, Panel, Avatar), UI 일부가 자체적으로 복잡한 (App, FeedStory, Comment) 경우에는 별도의 컴포넌트로 만드는 게 좋습니다.
(공식 문서에서 발췌)
State
Docs: https://ko.reactjs.org/docs/state-and-lifecycle.html#gatsby-focus-wrapper
State LifeCycle (Class Component)
- componentDidMount
- useEffect, deps를 빈배열로 : 마운트되자마자 호출된다.
- componentWillUnmount
- 위의 useEffect에서 return 부분에 작성한 부분 : clean up
hook의 등장으로 함수형 컴포넌트를 사용할 수 있다.
state관리, 재사용가능한 컴포넌트..
함수형컴포넌트만 앎으로 충분하다
하지만 ErrorBoundary의 경우에는 class 컴포넌트를 사용하므로 알아야 될 필요가 있다.
- 직접 state를 수정하지 말 것 (this.state)
- 비동기적 업데이트 (https://ko.reactjs.org/docs/state-and-lifecycle.html#state-updates-may-be-asynchronous)
컴포넌트 생명주기
Docs: https://ko.reactjs.org/docs/react-component.html#gatsby-focus-wrapper
생성되고, 보여지고, 사라지는 생명주기
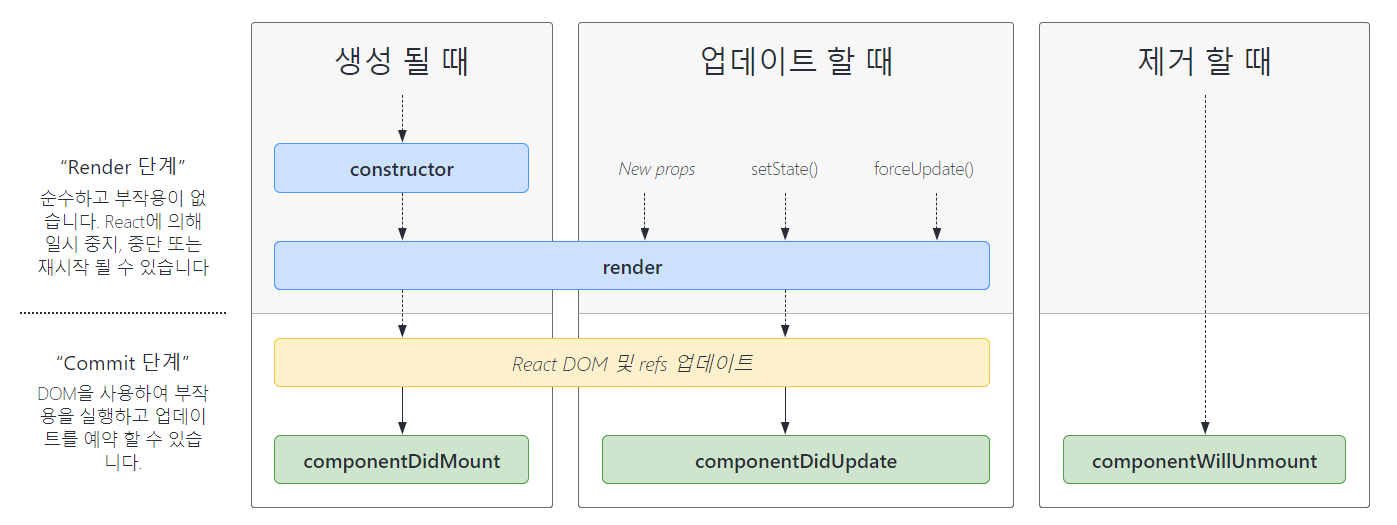
constructor - state 초기화, method 바인딩
render
DidMount - DOM 노트 초기화, data fetch
render
DidUpdate
WillUnmount - timer 제거, 요청취소, 구독 해제
함수형 컴포넌트 - hook으로 대부분 구현 가능
Class Component의 경우에는 this를 주의
arrow function
이벤트
https://ko.reactjs.org/docs/events.html
https://ko.reactjs.org/docs/handling-events.html
합성 이벤트 (Synthetic Event)
React를 사용하는 사용자에게 일관된 경험을 유도하도록
이벤트 처리하기
소문자대신 camel Case 사용
<button onClick={handleClick}>button</button>지원하는 이벤트
Capture
버블링 : 부모로 이벤트 전파
캡쳐 : 자식중에 누구에서 이벤트 일어났는지 찾음
캡쳐링이 일어난 후 버블링이 일어난다.
Capture -> target -> Bubble
조건부 렌더링
docs : https://ko.reactjs.org/docs/conditional-rendering.html
true && expression은 expressionfalse && expression은 항상 falsefalsy && A의 경우에는 falsy가 화면에 그려질 수 있으므로 주의
List
docs : https://ko.reactjs.org/docs/lists-and-keys.html
key는 props로 전달받을 수 없다.- key는 엘리먼트의 고유성을 갖기위해, 식별하기 위함
- 명시적으로 주지 않으면, index로 준다(그리고는 있다.) -> React가 알아서 : 하지만 좋지 않음.
리스트 항목에 명시적으로 key를 지정하지 않으면 React는 기본적으로 인덱스를 key로 사용합니다.Form
docs: https://ko.reactjs.org/docs/forms.html
제어 컴포넌트
value를 state로 관리
비제어 컴포넌트
- ref를 통해 값을 가져온다
- defaultValue를 이용해 기본값 지정
event.target.type, event.target.name 사용 가능
Hooks
class를 작성하지 않고도 state관리 가능
useEffect
docs: https://reactjs.org/docs/hooks-effect.html
componentDidMount + componentDidUpdate
구독과 정리
- componentDidMount & componentWillUnmount
- useEffect 하나에서 처리한다.
성능 최적화
- 특정 state의 변경에만 반응하도록
- componenetDidUpdate(prevProps, prevState) {...}
- dependency arr
- useEffect는 data fetch, subscribe, DOM 수정 등
- clean up : 구독, 구독해지
- dependency array : 필요한 변경이 있을때에만 해당 effect를 실행한다.
Hook의 규칙
docs: https://ko.reactjs.org/docs/hooks-rules.html
- 최상위에서
- 오직 React 함수 내에서 Hook을 호출 : 험수 컴포넌트, custom Hook
custom Hook
docs: https://ko.reactjs.org/docs/hooks-custom.html
여러 Hook을 모아놓은 함수
재사용될 함수를 만든다.
- useState, useEffect, useContext
- useReducer, useCallback, useMemo, useRef, useImperativeHandle, useLayoutEffect, useDebugValue
useReducer
docs: https://ko.reactjs.org/docs/hooks-reference.html#usereducer
Composition
docs: https://ko.reactjs.org/docs/composition-vs-inheritance.html
상속보다는 합성을 사용
- 컴포넌트에 컴포넌트를 담기 (children, custom)
- 특수화