
View
고차 컴포넌트 Higher Order Component
https://ko.reactjs.org/docs/higher-order-components.html
https://jeonghwan-kim.github.io/2022/05/28/react-high-order-component
컴포넌트를 가져와서 새로운 컴포넌트를 반환하는 함수
함수형 컴포넌트에서도 사용할 수 있다.
export default function Button() {
    const [loading, setLoading] = useState(true);

    useEffect(()=> {
        const timer = setTimeout(()=> setLoading(false), 1000));
        return ()=> clearTimeout(timer);
    }, [])
    return  loading ? <p>로딩중...</p>: <button>버튼</button>
}
export default function Input() {
return <input defaultValue="input" />
}공통영역을 custom Hook으로 만들수도 있지만, 고차컴포넌트로 만들 수도 있다.
export default function withLoading(Component) {
    const WithLoadingComponent = (props) => {
      const [loading, setLoading] = useState(true);

      useEffect(()=> {
          const timer = setTimeout(()=> setLoading(false), 1000));
          return ()=> clearTimeout(timer);
      }, [])
      return  loading ? <p>로딩중...</p>: <Component {...props}/>
    }

    return WithLoadingComponent;
}
Button은 아래와 같이 수정할 수 있다.
function Button() {
    return <button>Button</button>;
}

export default WithLoading(Button);
Input 의 변경
function Input() {
    return <input defaultValue="input" />
}

export default WithLoading(input);
React의 고민, 재사용성을 생각한 결과
Memoization
동일한 계산을 반복해야 할 때, 이전에 계산한 값을 메모리에 저함으로써 동일한 계산의 반복수행을 제거하여 프로그램의 실행속도를 빠르게 한다.
React.memo
https://ko.reactjs.org/docs/react-api.html#reactmemo
동일한 props로 렌더링을 하게 되면, Reacct.memo를 사용하여 성능향상을 누릴 수 있다.
memo를 사용하면, React는 마지막으로 렌더링된 결과를 재사용한다.
HOC/Props 비교해서 memoization
useCallback
전달받는 함수를 memoization
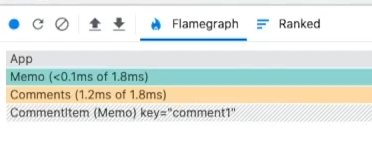
Profiler로 성능 측정
https://ko.reactjs.org/docs/profiler.html
Profiler는 React 애플리케이션이 렌더링하는 빈도와 렌더링 “비용”을 측정합니다. Profiler의 목적은 메모이제이션 같은 성능 최적화 방법을 활용할 수 있는 애플리케이션의 느린 부분들을 식별해내는 것입니다.
useMemo
https://ko.reactjs.org/docs/hooks-reference.html#usememo
- 특정컴포넌트를 최적화 - React.memo
- 특정함수를 최적화 - useCallback
- 특정 값을 최적화 - useMemo
무언가를 만들어보려면? 스타일링이 막연하다면?
- 다른 사이트를 카피해봐라 (따라그리기, 반복연습)
- 개발자 도구로 style확인해보기
- 동작(js)도 카피해보기
Context
https://ko.reactjs.org/docs/context.html
컴포넌트 트리를 넘어 데이터를 공유할 수 있는 방법
상태, props를 통해 데이터를 관리하는 React
Children이 깊어지게 되면 props drilling이 일어나게 된다. 이를 해결 하는 방법으로 Context를 이용할 수 있다.
- 예 : 현재 로그인한 유저, theme, language
- 앱 전체에서 알아야하는 광범위한 정보
컴포넌트 합성으로 해결 가능하다면 합성으로 해결하자.
- 컴포넌트 트리의 제약 : props drilling 발생 - 이 한계를 Context가 해소할 수 있도록 한다.
- 재사용성 : Context 이용시 재사용이 어렵다.
- 쌓여있는 Context에 의존적(감싸줘야한다.)
Portal
DOM 계층 구조 바깥에 있는 DOM 노드로 자식을 렌더링 한다.
https://ko.reactjs.org/docs/portals.html
일반적으로 나를 감싸고있는 부모 내부에 그린다.
부모컴포넌트 DOM트리로부터 벗어날 수 있게 해 준다.
- Portal의 이벤트도 root에 전달할 수 있다.
- 이벤트 버블링으로 캐치할 수 있다.
Render Props
https://ko.reactjs.org/docs/render-props.html
React 컴포넌트 간에 코드를 공유하기 위해 함수 props를 이용
- render props : 무엇을 렌더링할 지 알려준다.
- props가 render일 필요는 없고, children도 되고 무엇이든 된다.
- pure component: props, state를 비교하여 성능을 최적화 한다.
- 함수로 props를 비교하면 얕은 비교만 하므로 비추천 -> 그냥 React Component를 써라.
개발을 잘 하는 사람?

나의 장점은 무엇인가? 항상 고민하고 그 부분을 파고 들어보자!
Prop Types
https://ko.reactjs.org/docs/typechecking-with-proptypes.html
props로 넘겨주는 데이터의 type을 확인하기 위한 도구
- 예: Flow, TypeScript와 같은 정적 타이핑 도구
- number라는 props를 주는데, type이 number가 아닌 경우 에러 발생
버그를 많이 잡을 수 있다.
- PropTypes는 개발모드에서만 동작
- custom할 수 있다.
- RegExp등으로 사용자 정의를 할 수 있다.
customArrayProp: PropTypes.arrayOf(function(propValue, key, componentName, location, propFullName) { if (!/matchme/.test(propValue[key])) { return new Error( 'Invalid prop `' + propFullName + '` supplied to' + ' `' + componentName + '`. Validation failed.' ); } })
- children 제한 가능 (제약이 없던 갯수 제약 등)
Reconciliation (재조정)
https://ko.reactjs.org/docs/reconciliation.html
UI 갱신에 대한 React의 접근 방법
- React의 diff 알고리즘
- 값이 바뀐다면, UI가 바뀐다는 것만 알고 작업 가능
- 컴포넌트의 갱신이 예측 가능, 고성능
- 타입이 다르면 DOM 트리는 다르다 - 끝까지 비교할 필요가 없음
- 개발자가 key prop을 통해, 여러 엘리먼트 사이에서 어떤 자식 엘리먼트가 변경할 필요 없는 것인지 알 수 있게 한다.
- DOM 엘리먼트의 타입이 같은경우
- 속성만 갱신한다.
- 해당 노드의 자식들을 재귀적으로 처리
- 자식에 대한 재귀적인 처리
- 맨뒤에 자식을 추가하는 건 효율적으로 동작할 수 있지만, 맨앞에 추가하는 등의 동작은 비효율적일 수 있다.
- key 를 사용하여 개선 : 효율성 확보
Virtual DOM
https://ko.reactjs.org/docs/faq-internals.html
가상의 표현을 메모리에 저장하고 실제 DOM과 동기화 하는 과정. 재조정
업데이트들을 묶어서, 유의미한 타이밍에 업데이트한다.
Design Principles
https://ko.reactjs.org/docs/design-principles.html
- Virtual DOM : 실제 DOM과 동기화 할 가상 표현
- 재조정(reconciliation) : 실제 DOM과 Virtual DOM의 동기화
- React Fiber : 스택 reconciler 를 대체한 재조정 엔진
React Developer Tools

브라우저 Extension
- Component를 선택하고
$r을 콘솔에 입력시 해당 컴포넌트에 대한 객체를 볼 수 있다. - Profiler는 녹화 버튼을 이용
React로 사고하기
https://ko.reactjs.org/docs/thinking-in-react.html
- 컴포넌트를 나누고
- 데이터를 가져오고
- 상태를 관리하고
- 각각 기능을 구현하고
- 디자인을 입히고
styled-components
스타일링 라이브러리
css in js
https://speakerdeck.com/vjeux/react-css-in-js
CSS의 문제점
- Global Namespace : 글로벌 변수를 지양해야하는 JS와 대치된다.
- Dependencies : css간의 의존 관리
- Dead Code Elimination : 안쓰는 css코드인지 알기가 어렵다.
- Minification : 클래스 이름 최소화
- Sharing Constants : JS의 코드와 값을 공유할 필요 (props등..)
- Non-deterministic Resolution : css 파일 로드 타이밍 이슈
- Isolation : 격리
styled-component
https://styled-components.com/
style이 들어간 react component를 만들어준다.
- Automatic critical CSS : 자동으로 styled injects & 코드 스플릿
- No class name bugs: unique한 클래스명을 만들어줌, overlap x, missspellings
- Easier deletion of CSS : tied to a specific component
- Simple dynamic styling: props / global theme
- Painless maintenance: styling affecting your component
- Automatic vendor prefixing: current standard only
Extending styles
https://styled-components.com/docs/basics#extending-styles
상속(확장) 또한 가능하다.
const TomatoButton = styled(Button)`
  color: tomato;
  border-color: tomato;
`;
props 전달
https://styled-components.com/docs/basics#passed-props
css와 비교
https://styled-components.com/docs/basics#coming-from-css
render 메서드 밖에서 선언해라
컴포넌트 밖에 styled-component를 선언하라!
- 내부에 하게되면, // WARNING: THIS IS VERY VERY BAD AND SLOW, DO NOT DO THIS!!!
Pseudoelements, pseudoselectors, and nesting
https://styled-components.com/docs/basics#pseudoelements-pseudoselectors-and-nesting
Attaching additional props
https://styled-components.com/docs/basics#attaching-additional-props
- 가상 엘리먼트, 가상 선택자 사용 가능
- Global Style : 전역 스타일 사용 가능
- attrs : props addition
- keyframes, ThemeProvider : Animation, Theme
Sass
Preprocessor
CSS 전처리기
CSS를 생성. Sass로 무언가를 하면, CSS로 만들어준다.
CSS에 없는 기능(mixin, nesting selector, inheritance 등..)
CSS확장하는 Preprocessing
프로젝트가 커지면 css 관리가 힘들어지므로...
마치 변수처럼 사용할 수 있게 한다.
$font-stack: Helvetica, sans-serif;
$primary-color: #333;
Nesting
SCSS SYNTAX
nav {
  ul {
    margin: 0;
    padding: 0;
    list-style: none;
  }

  li { display: inline-block; }

  a {
    display: block;
    padding: 6px 12px;
    text-decoration: none;
  }
}
모듈화
@use 'base'; /*  _base.scss  */

.inverse {
  background-color: base.$primary-color;
  color: white;
}
mixin
@mixin theme($theme: DarkGray) {
  background: $theme;
  box-shadow: 0 0 1px rgba($theme, .25);
  color: #fff;
}

.info {
  @include theme;
}
.alert {
  @include theme($theme: DarkRed);
}
.success {
  @include theme($theme: DarkGreen);
}
At rules
https://sass-lang.com/documentation/at-rules
라이브러리를 고리는 기준
npm trends
비교할 수 있다.
어떤 것을 선택할 것인지는 개발자에 달려있다.
경험
반응형 웹 대응을 위해 media query를 많이 쓰고 design system이 마련되어 있지 않은 곳에서 sass 사용
개발편의성을 생각하면, css in js 사용 (ex. emotion)
Redux
컴포넌트간의 커뮤니케이션
props drilling
- 전달만 하는 컴포넌트들의 문제점..
- Context API 사용
- 전역 데이터를 잘 활용하는 것이 중요
- 전역 데이터를 어떻게 잘 활용할 것인지 -> Redux
- Context API 사용

STORE내부의 상태를 보라색 공이 변경 가능, 나머지 아이들이 STORE를 사용한다면 자동으로 변경(렌더링)
단일 스토어를 만드는 법- React에서
STORE를 사용하는 법
단일 STORE
- import redux
- action 정의하기
- reducer(action을 사용한다) 만들기
- reducer를 합친다.
- 최종적으로 합쳐진 reducer를 인자로 단일 STORE를 만든다.
사용하기
준비한 store 를 React component에서 사용하기
- import react-redux
- connect HOC를 이용해서 컴포넌트 연결 or Hooks를 이용하여 connect를 대체
npx create-react-app redux-start
cd redux-start
npm i redux // redux 설치
Action
- Action은 사실 객체이다.
- 두 가지 형태
- {type: "TEST"} // payload 없는 액션
- {type: "TEST", params: "hello"} // payload 있는 액션
- type만이 필수 프로퍼티이며, type은 문자열
Action은 store에 전달이 되면 store의 상태를 변경시킨다.
함수를 통해서 액션을 생성한다. (실수 방지)
Action 생성자
function 액션생성자(...args) {
    return 액션;
}- Action을 생성하는 함수를 액션 생성자 (Action Creater)
- 이를 통해 액션을 생성하여, 액션 객체를 return
- Action의 종류 별로 Action의 생성함수가 똑같은 숫자로 만들어진다.
Action이 하는 일
- 액션 생성자를 통해 액션을 만든다.
- 만들어낸 액션 객체를 redux store에 보낸다.
- redux store가 액션 객체를 받으면 store의 상태 값이 변경된다.
- 변경된 상태 값에 의해 상태를 이용하는 컴포넌트가 변경된다.
- action은 store에 보내는 일종의 input이라 생각할 수 있다.
action을 준비하기 위해서는
- 액션의 type을 정하여 변수로 빼기 (미리 정의)
- 강제는 아니지만, 그냥 문자열로 넣으면 실수가능성
- 미리 정의한 변수(일종의 상수)를 사용하면, 스펠링 등 주의를 덜 기울여도 된다.
- 액션 객체를 만들어 내는 함수를 만드는 단계
- 하나의 액션 객체를 만들기 위해 하나의 함수를 만든다.
- 액션의 타입은 위에서 미리 정의한 타입 변수(상수)로 부터 가져와서 사용하면, 실수를 방지할 수 있고 변경시에도 수월하다.
액션 객체 만들기, 액션 생성자 함수 만들기 - 순수한 JS
const ADD_TODO = "ADD_TODO"; // 보통 action의 type은 _와 대문자로 구성

function addTodo(todo) {
  return {
    type: ADD_TODO,
    todo,
  };
}
Reducer
액션을 주면, 그 액션이 적용되어 달라진(안달라질수도 있다) 결과를 만들어 준다.
- 함수
- pure function
- 같은 인자를 주면, 항상 같은 결과
- immutable
- 첫 state와 변화된 state가 다른 객체
- reducer를 통해 state가 달라졌음을 redux가 인지하는 방식
- pure function
fucntion reducer(prevState, action) {
    return newState;
}- action을 받아서 state를 return 하는 구조
- 인자로 들어오는 prevState와 return되는 newState는 다른 참조를 가지도록 하여야 한다.
export const ADD_TODO = "ADD_TODO";

import { ADD_TODO } from "./actions";
// state의 모습 구상하기
// ['할일1', '할일2']; 와 같은 형태

const initialState = [];

function todoApp(previousState = initialState, action) {
  // 초기값 지정
  // if (previousState === undefined) {
  //   return [];
  // }

  if (action.type === ADD_TODO) {
    return [...previousState, action.todo]; // 새로운 객체를 만들어야 함
  }

  return previousState; // 아무 변화 없는 경우
}
createStore
store를 만드는 함수
상태, 상태를 변경하는 action을 이용해서 상태 관리
인자 3개
createStore<S>(
  reducer: reducer함수,
  preloadedState: initialState(넣지 않으면, 최초값 undefined이므로 reducer함수에서 처리),
  enhancer?: StoreEnhancer
) : Store<S>
dispatch
useReducer처럼, store.dispatch(액션객체)
import store from "./redux/store";
import addTodo from "./redux/actions";

console.log(store);
console.log(store.getState());

store.dispatch(addTodo("coding"));
console.log(store.getState());
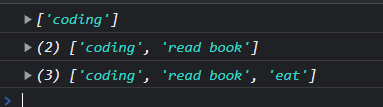
import store from "./redux/store";
import { addTodo } from "./redux/actions";

store.subscribe(() => {
  console.log(store.getState());
});

store.dispatch(addTodo("coding"));
store.dispatch(addTodo("coding"));
store.dispatch(addTodo("read book"));
store.dispatch(addTodo("eat"));
구독해 놓으면, dispatch가 일어났을 때 함수가 계속 호출 된다.
combineReducers
https://redux.js.org/api/combinereducers
import { combineReducers } from "redux";
import todos from "./todos";
import filter from "./filter";

const reducer = combineReducers({ todos, filter });

export default reducer;
React와 Redux 연결하기
react-redux 안 쓰고 연결하기
단일 store를 만들고, subscribe와 getState를 이용하여 변경되는 state 데이터를 얻어 props로 계속 아래로 전달해왔다.
- componentDidMount - subscribe
- componenetWillUnmount - unsubscribe
- props로 store 내려주기
<App store={store} />react-redux 사용하여 연결하기
- Provider 컴포넌트를 제공
- connect 함수(HOC)를 통해
container를 생성- 컨테이너는 스토어의 state와 dispatch(액션)을 연결한 컴포넌트에 props로 넣어주는 역할
그렇다면, 필요한 것은
- 어떤 state를 어떤 props에 연결할 것인지에 대한 정의
- 어떤 dispatch(액션)을 어떤 props에 연결할 것인지에 대한 정의
- 그 props를 보낼 컴포넌트를 정의